Title here
Summary here
To set up the simulation, you will need to use the ready-to-use image from Docker Hub.
Both the Gazebo and MuJoCo simulations rely on the same image — you just need to choose which one to use when launching the container.
Download Docker Desktop for your OS and follow the install instructions.
You don’t need to be logged in, as the image is open.
Apple Silicon (M1/M2)
For Apple Silicon Macs, Docker uses Rosetta to run x86_64 images.
Follow these steps after installing Docker Desktop:
softwareupdate --install-rosettaDocker settings > GeneralUse Virtualization FrameworkUse Rosetta for x86/amd64 emulation on Apple SiliconApply & RestartIf the Rosetta integration option is not available, update your macOS version (it should be available from macOS Sonoma (v14)).
docker run --rm --platform linux/amd64 busybox uname -mThis should output x86_64 if emulation is working.
From Docker Desktop, search for reachy2 image in the search bar (you don’t need to sign in):
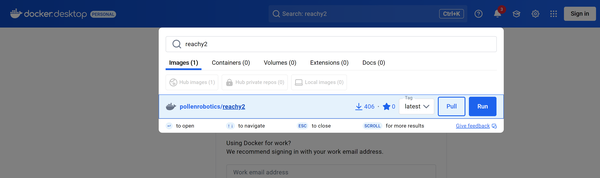
Click Pull and wait a few minutes for the image to be downloaded:

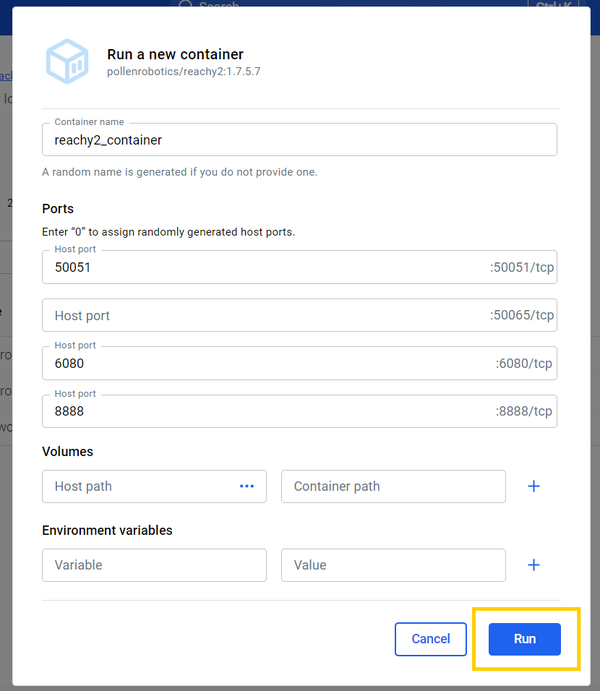
When the download is over, click Run to launch a container of the image via the Docker Desktop GUI. This will open a configuration pop-up.

Make sure you expand the Optional settings to configure properly the ports, and configure the port as shown below:

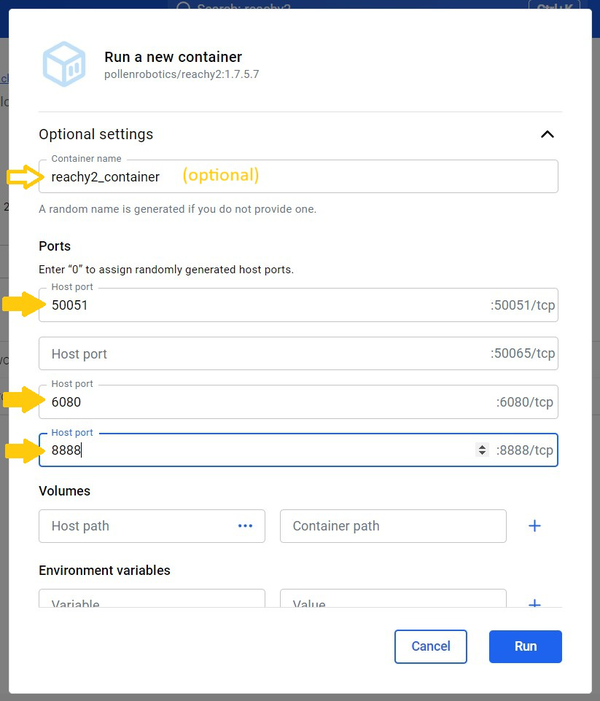
Click Run to finally launch the container!
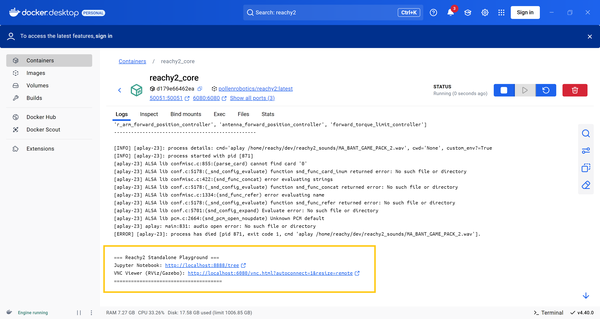
After a few seconds, you should have a running container displaying the following elements:

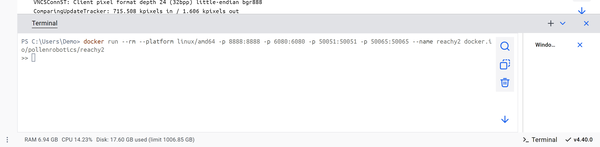
If you prefer using the terminal, you can run the following command:
docker run --rm --platform linux/amd64 -p 8888:8888 -p 6080:6080 -p 50051:50051 --name reachy2 docker.io/pollenrobotics/reachy2This is a one-liner that launches the container with the required ports exposed.
If using an Apple Silicon (aarch64) platform, add --platform linux/amd64 to the command.
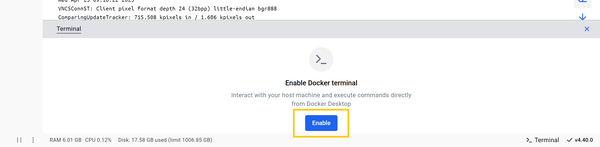
Note: you have a terminal accessible from Docker Desktop
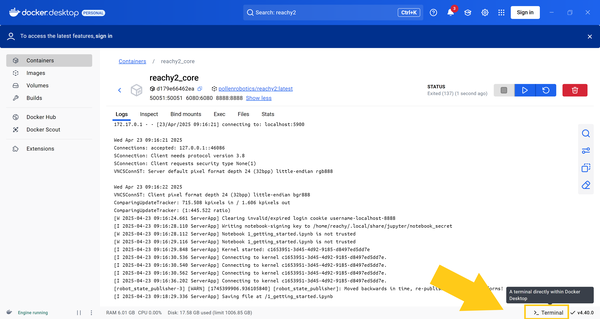
You can simply enable it:
To launch the simulation with Gazebo and additional configurations, you can add arguments to the CLI command like this:
docker run --rm --platform linux/amd64 -p 8888:8888 -p 6080:6080 -p 50051:50051 --name reachy2 docker.io/pollenrobotics/reachy2 start_rviz:=true start_sdk_server:=true fake:=true orbbec:=false gazebo:=true⚠️ For now, MuJoCo’s performance in the simulator is very low, but we’re working on it.
To launch the simulation with MuJoCo, modify arguments of the CLI command as follow:
docker run --rm --platform linux/amd64 -p 8888:8888 -p 6080:6080 -p 50051:50051 --name reachy2 docker.io/pollenrobotics/reachy2 start_rviz:=true start_sdk_server:=true fake:=true orbbec:=false mujoco:=trueThis will open the MuJoCo simulation with Reachy 2 in a default empty scene.More scenes are available in the Reachy 2 MuJoCo Assets repository. To use a different provided scene (let’s say fruits_scene.xml), you can run the same command as above with the scene argument added:
docker run --rm --platform linux/amd64 -p 8888:8888 -p 6080:6080 -p 50051:50051 --name reachy2 docker.io/pollenrobotics/reachy2 start_rviz:=true start_sdk_server:=true fake:=true orbbec:=false mujoco:=true scene:=fruitsDon’t hesitate to add your own scenes to the reachy2_mujoco_assets repository and use them in the same way!
To access the displays, open the following URL in your web browser: localhost:6080/vnc.html?autoconnect=1&resize=remote
To access the notebook interface, go to: localhost:8888/tree
Those two links are available in the logs when the container is launched:
Don’t hesitate to check out the next section to get started with programming the robot in simulation!