Controlling the arm
Learn how to control Reachy's arms and what information you can get from its sensors.
Make sure you checked the safety page before controlling the arm.
This section assumes that you went through the Hello World so that you know how to connect to the robot.
Arm presentation
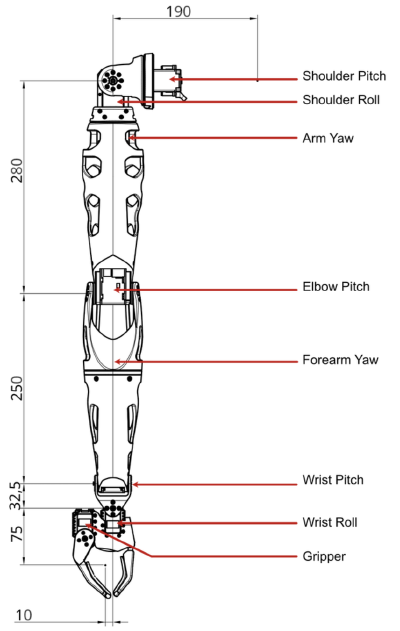
Reachy’s arm offers 7 degrees of freedom + 1 provided by the gripper and is composed of 8 joints.
The arm’s mechanical specifications are given here but as a reminder, the arm schematic is given below:
The joints
Each joint has a unique name and uid. To access a specific joint, you can either use reachy.joints which has each joint in the robot as attribute or reachy.l_arm/reachy.r_arm depending on which arm the joint belongs to of course.
First, connect to your Reachy.
from reachy_sdk import ReachySDK

reachy = ReachySDK(host='192.168.0.42')  # Replace with the actual IP

reachy.joints.r_shoulder_pitch
>>> <Joint name="r_shoulder_pitch" pos="27.98" mode="compliant">
The name and the id are attributes of the returned Joint object.
reachy.r_arm.r_shoulder_pitch.name
>>> 'r_shoulder_pitch'
reachy.r_arm.r_shoulder_pitch.uid
>>> 8
The uid returned by the sdk is different from the id you may have seen in the mechanical specifications. The motor’s id in the mechanical specification is the one used at lower level by the dxl bus to communicate with the motors whereas the uid that you see in the sdk is the one used by the different grpc services.
What information do you have access to?
From the joints
As explained, each joint composing an arm can be accessed using reachy.r_arm for the right arm and reachy.l_arm for the left arm.

All the joints of a given arm can also be accessed simultaneously with the .joints attribute.
reachy.r_arm.joints
>>> <Holder
	<Joint name="r_shoulder_pitch" pos="27.98" mode="compliant">
	<Joint name="r_shoulder_roll" pos="-5.51" mode="compliant">
	<Joint name="r_arm_yaw" pos="-6.73" mode="compliant">
	<Joint name="r_elbow_pitch" pos="-71.34" mode="compliant">
	<Joint name="r_forearm_yaw" pos="0.15" mode="compliant">
	<Joint name="r_wrist_pitch" pos="-41.63" mode="compliant">
	<Joint name="r_wrist_roll" pos="-20.38" mode="compliant">
	<Joint name="r_gripper" pos="19.50" mode="compliant">
>
This can be useful when you want to recover information like the position or the temperature of multiple arm joints at once.
Beside the joint name and uid there are multiple information which can be obtained from each joint, these are summarized in the registers() method.
reachy.r_arm.r_shoulder_pitch.registers()
>>> {'name': 'r_shoulder_pitch',
 'uid': 8,
 'present_position': 22.441230263406165,
 'temperature': 41.0,
 'compliant': True,
 'goal_position': -0.32800019809599856,
 'speed_limit': 0.0,
 'torque_limit': 100.0,
 'pid': (32.0, 0.0, 0.0)}
present_position
You can get the present position of each joint with this attribute.
reachy.r_arm.r_shoulder_pitch.present_position
>>> 22.4
This can be useful in situations such as when you want to record a movement. For example you want to lift an object, you move the arm once yourself, store the present_position of each joint involved and replay it. This is what we used to get the movements in our Tictactoe application!
Also if you want to teach movements to the robot with learning technics, storing the present_position of the joints will help you build a dataset.
temperature
You also have access to each motor temperature with the temperature attribute of each joint. This temperature should be checked to make sure that the robot can operate correctly. The temperature is also monitored internally in Reachy and fans are turned on when the joints are heating.
Check the safety page before controlling the arm for more information.
reachy.r_arm.r_shoulder_pitch.temperature
>>> 41.0
compliant
As explained in the [previous page], each motor in Reachy has two compliance modes: compliant where the motor is soft and can be freely turned by hand and stiff where the motor is hard and can only be moved by setting a target position.
A joint’s compliance mode can be easily changed by setting its compliant attribute. At startup by default, all joints are compliant.
reachy.r_arm.r_shoulder_pitch.compliant
>>> True
reachy.r_arm.r_shoulder_pitch.compliant = False # stiff mode
reachy.r_arm.r_shoulder_pitch.compliant
>>> False
reachy.r_arm.r_shoulder_pitch.compliant = True # compliant mode
reachy.r_arm.r_shoulder_pitch.compliant
>>> True
Because you will often want to turn stiff/compliant all the joints in an arm, in the head or each Reachy’s joints, the methods turn_on() and turn_off() are provided in the SDK.
- reachy.turn_on(part: str): turn all the joints in the requested part in stiff mode,
- reachy.turn_off(part: str): turn all the joints in the requested part in compliant mode.
The part argument in these methods can either be ‘reachy’, ’l_arm’, ‘r_arm’ or ‘head’. Using ‘reachy’ will turn on/off each joint in Reachy.
reachy.turn_on('r_arm')
Check Reachy’s right arm after sending this command, if you try to move it with your hands you should feel the resistance applied by the right arm’s motors to stay in their position. You can compare with the left arm’s motors which should be in compliant mode.
Once you’re done using the arm, don’t forget to turn it back to compliant mode.
reachy.turn_off('r_arm')
Switching from stiff to compliant for a joint can present a risk of harming Reachy because if the arm was stiff and in the air, it will just fall on what is below him. For example if you have Reachy above a table, place its arm in stiff mode and then in compliant mode, the arm will fall quite hard on the table unless you place your hand below to support the fall.
That is why we also implemented the turn_off_smoothly method. With this, we first reduce the torque limit of the joint and then turn it to compliant mode. This result in a smoother transition between the two states.
See the difference below where both Reachy’s arms are up and in stiff mode. To put them in compliant mode, we use turn_off on the left arm and turn_off_smoothly for the right arm.
reachy.turn_on('reachy')
reachy.turn_off('l_arm')
reachy.turn_off_smoothly('r_arm')
goal_position
The goal_position attribute of a joint is what is used to set a new joint’s target position to make it move. However, we recommend using the goto() function to move the motors which provides better control on the joint’s trajectories.
torque/speed_limit
The torque limit represents the percentage of maximum torque that the motor will use to stay in its present position when it is in stiff mode. We set it to 100% on each joint.
reachy.r_arm.r_shoulder_pitch.torque_limit
>>> 100.0
According to the motors documentation, the speed is in rpm (raw per minute).
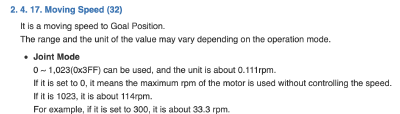
source: https://emanual.robotis.com/docs/en/dxl/ax/ax-18a/#ccw-angle-limit
We set the speed limit to 0 on each joint, meaning that the motors work at maximum speed.
reachy.r_arm.r_shoulder_pitch.speed_limit
>>> 0.0
IMPORTANT We recommend you NOT to change these values. When you want to make movements with Reachy, it’s better to replay recorded trajectories or to work with the [goto() function].
pid
You can get and set the pid of each joint with the pid attribute.
reachy.r_arm.r_shoulder_pitch.pid
>>> (32.0, 0.0, 0.0)
If you are familiar with control theory, you’ll know what it represents, if not don’t worry just ignore it!
From the force sensor
In the 2023 version of Reachy, only one force sensor is used per arm and it is placed in the gripper to determine if the gripper has an object in it or not.
The force sensor is a 0.78kg micro load cell, it is placed in the arm’s gripper as shown below

The force sensor of each arm is accessible with reachy.force_sensors.
reachy.force_sensors
>>> <Holder
	<ForceSensor name="l_force_gripper" force="29.76">
	<ForceSensor name="r_force_gripper" force="-67.72">
>
For each force sensor, you can get its name and its force value.
reachy.force_sensors.l_force_gripper.name
>>> 'l_force_gripper'
reachy.force_sensors.l_force_gripper.force
>>> 29.8
The force value measures small deformations of the cell happening when an object is in the gripper. The interesting thing with this is that you can know how much Reachy is squeezing an object and determine a threshold where Reachy holds the object enough to manipulate it without forcing too much on the gripper motor.
goto() function
Presentation
This function generates a trajectory between the present position and the goal position. This trajectory is then interpolated at a predefined frequency (100Hz) to compute all intermediary target positions that should be followed before reaching the final goal position. Depending on the interpolation mode chosen, you can have a better control over speed and acceleration.
The two interpolation modes that we use consist in working either linearly or with the minjerk function.
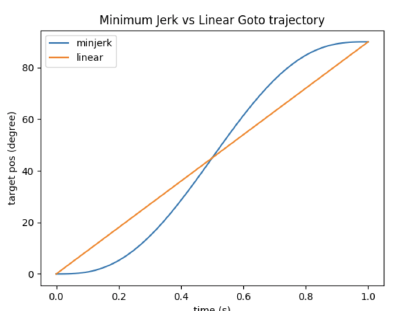
Both trajectories start and finish at the same point but don’t follow the same intermediate positions. The minimum jerk will slowly accelerate at the begining and slowly decelerate at the end. This makes the movements more natural.
The goto() function takes as arguments:
- goal_positions: dictionnary whose items are the joints you want to move with their goal positions,
- duration: duration in seconds of the trajectory,
- starting_positions (optional): dictionary whose items are the joints you want to move with their starting positions. By default it is a dictionary where the keys are the joints requested goal_positions with their present position,
- sampling_freq (optional): sampling frequency in hz for the trajectory interpolation, 100Hz by default,
- interpolation_mode: interpolation mode used to interpolate the trajectory, either InterpolationMode.LINEAR or InterpolationMode.MINIMUM_JERK.
The function doc is also available here.
Example
Let’s see an example of how to use it.
You will use the goto() to place the right arm at a right-angled position. First, make sure that the Reachy’s right arm is placed on a cleared table and that there will not be obstacles during its movement.
The setup should look like this:

Import everything needed to execute the goto():
from reachy_sdk.trajectory import goto
from reachy_sdk.trajectory.interpolation import InterpolationMode
Define the dictionary for the right-angled position for the right arm, this will be the goal_positions argument of the *goto():
right_angled_position = {
    reachy.r_arm.r_shoulder_pitch: 0,
    reachy.r_arm.r_shoulder_roll: 0,
    reachy.r_arm.r_arm_yaw: 0,
    reachy.r_arm.r_elbow_pitch: -90,
    reachy.r_arm.r_forearm_yaw: 0,
    reachy.r_arm.r_wrist_pitch: 0,
    reachy.r_arm.r_wrist_roll: 0,
}
For the goto() to work, the right arm’s joints need to be in stiff mode.
reachy.turn_on('r_arm')
Then the goto(), here we use a duration of 1 second with the minimum jerk as interpolation mode but feel free to change it.
goto(
	goal_positions=right_angled_position,
	duration=1.0,
	interpolation_mode=InterpolationMode.MINIMUM_JERK
	)
The result should look like this:
Don’t forget to put the right arm’s joints back to the compliant mode. Place your hand below the right arm’s gripper to prevent the arm from falling hard on the table.
reachy.turn_off('r_arm')