Connect to Reachy 2
1. Find Reachy 2 IP
You can either use your robot’s name (written on the back of its neck) or its IP address.
If you need help finding its IP address, go to this section
2. Check your VR setup is ready
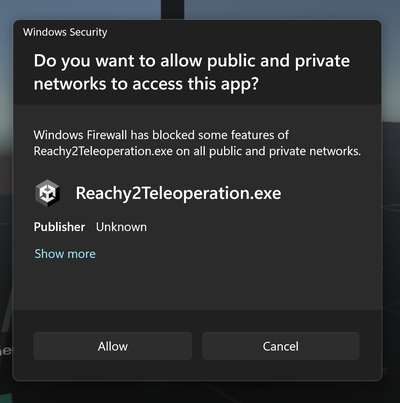
- First check your PC is connected to the same network as the robot.
- Connect your VR device to your PC and make sure it is ready to be used. Depending on your headset, the menus you should get in when ready for use is different. Check your headset section for more information on how to start correctly.
Meta headsets (Quest 2, Quest 3 and Rift)
Follow the steps of the section Setup Link from the official Meta website.
You should then enter a white menu. When you are in, your VR device is ready.HTC Vive
Coming soonValve Index
Coming soon
3. Launch the application
Once everything is ready, you can launch the application.
Run Reachy2Teleoperation from your computer.
4. Connect to the robot
Create a new robot entry in the menu with the IP address you previously found.
The IP can either be:
- the robot name followed by .local.
For example, if your robot name was r2-0000, enter “r2-0000.local”. - the real robot IP, as written in the Network section of the dashboard.
Note that you must select the input fields with your VR beam and fill them in using your computer keyboard.
Once the robot is created, select it and click on “Connect”.
You should then arrive in the transition room of the application.
A message to allow the network access to the app may pop up, in this case allow access:
Make sure the connection is fine by checking the information displayed at the top of the mirror.
You must see:
- a green text telling you “Connected to Reachy”
- the view of the robot displayed in miniature
- a good network connection indication